Uncategorized files
Jump to navigation
Jump to search
Showing below up to 50 results in range #151 to #200.
-
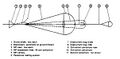 FIGURE 7-10. Main-Parachute Assembly..jpg 602 × 294; 31 KB
-
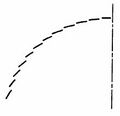
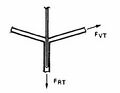 FIGURE 7-11. Vent-Tape Geometry..jpg 235 × 182; 6 KB
-
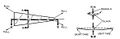 FIGURE 7-12. Bench Check on Gore Fullness..jpg 589 × 192; 16 KB
-
 FIGURE 7-13. Gore Layout for Gore Dimensions..jpg 317 × 284; 15 KB
-
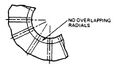 FIGURE 7-14. Vent Construction..jpg 301 × 168; 11 KB
-
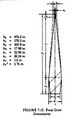 FIGURE 7-15. Final Gore Dimensions..jpg 251 × 409; 17 KB
-
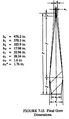 FIGURE 7-15 Final Gore Dimensions.jpg 518 × 894; 69 KB
-
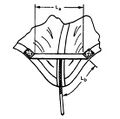 FIGURE 7-16. Pocket Band Arrangement..jpg 276 × 274; 14 KB
-
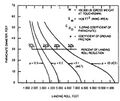
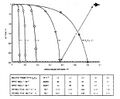
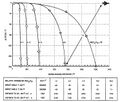
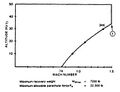 FIGURE 7-17. Drone Flight Envelope..jpg 448 × 343; 18 KB
-
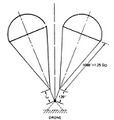
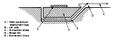
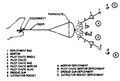
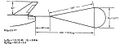 FIGURE 7-18. Drogue Chute Arrangement..jpg 588 × 234; 19 KB
-
-
-
 FIGURE 7-20. Canopy Gore Layout..jpg 589 × 552; 56 KB
-
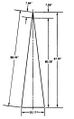 FIGURE 7-21. Preliminary Gore Dimensions..jpg 326 × 526; 18 KB
-
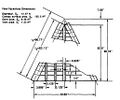 FIGURE 7-22. Final Gore Dimensions..jpg 516 × 428; 35 KB
-
-
 FIGURE 7-4. Determination of Equivalent Forebody Diameter..jpg 376 × 145; 11 KB
-
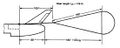 FIGURE 7-5. Extraction-Parachute Assembly..jpg 549 × 219; 17 KB
-
 FIGURE 7-6. Pilot Chute Assembly..jpg 608 × 189; 18 KB
-
 FIGURE 7-7. Main Parachute Assembly; Cluster of Two Parachutes..jpg 1,047 × 395; 57 KB
-
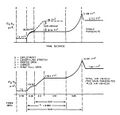
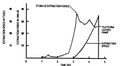
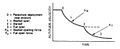 FIGURE 7-8. Velocity-Time Profile..jpg 604 × 245; 20 KB
-
-
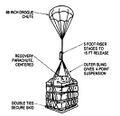
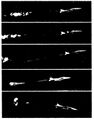
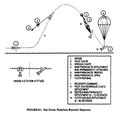 FIGURE 8-1. Salt Drone Parachute Recovery Sequence..jpg 673 × 631; 53 KB
-
 FIGURE 8-10. Plan Form of the 6.2-Meter Aeroconical..jpg 467 × 411; 43 KB
-
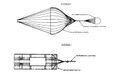 FIGURE 8-11. Assembly Components of the 6.2-Meter Aero conical..jpg 736 × 451; 35 KB
-
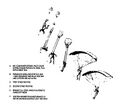 FIGURE 8-12. Opening Sequence of AGES Parachute Assembly..jpg 699 × 626; 41 KB
-
-
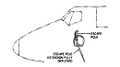
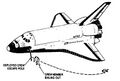 FIGURE 8-14. Crew Bailout Mode-Crew Escape Pole..jpg 713 × 480; 38 KB
-
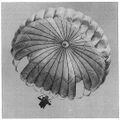
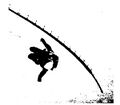 FIGURE 8-15. Navy Test Jumper Using Crew Escape Pole..jpg 598 × 525; 25 KB
-
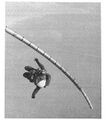 FIGURE 8-15. Navy Test Jumper Using Crew Escape Pole.2.jpg 551 × 623; 133 KB
-
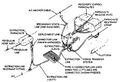 FIGURE 8-16. Parachute Extraction System for Cargo Platforms..jpg 691 × 470; 58 KB
-
 FIGURE 8-17. Standard Airdrop Method..jpg 850 × 712; 50 KB
-
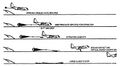 FIGURE 8-18. The LAPES C-130 platform Extraction System..jpg 788 × 432; 45 KB
-
-
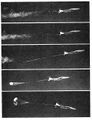
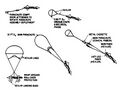 FIGURE 8-2. Sequence of CL 289 Drone Recovery..jpg 836 × 626; 51 KB
-
-
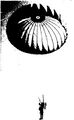 FIGURE 8-21, T-10 Paratrooper Parachute..jpg 418 × 680; 66 KB
-
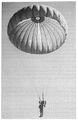 FIGURE 8-21, T-10 Paratrooper Parachute.2.jpg 510 × 784; 167 KB
-
-

-
-
-
-
-
-
-
-
-
-
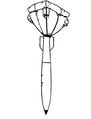 FIGURE 8-29. Mark 83 Bomb With Ballute-Type Retarder..jpg 363 × 476; 14 KB


..jpg)


._First-Stage_Configuration..jpg)


_on_Down-Range_distance,_Impact_Angle,_and_Aircraft_Separation_Instance..jpg)
_on_Down-Range_distance,_Impact_Angle,_and_Aircraft_Seperation_Instance.2.jpg)
